Blog

Switched to OpenSuse. Except I’m going back to Fedora

Haha!

So, at the advice of a friend on Twitter, I installed openSuse over Fedora. It’s worked pretty well so far, but.

There’s some things that just aren’t working right in openSuse. And I’m starting to dislike novell products. Couple that with some issues (mumble absolutely hates my mic for some reason, repositories being a mess under openSuse, bluetooth support is complicated to say the least), and Fedora 14 coming out . . . .

I’ve decided to triple boot the netbook until I figure out if I want to stick with opensuse or switch to Fedora. To be honest, I never though I would be one of those triple boot boot nut cases. But here I am triple booting. Mostly because I still want openSuse for a few things (I think). If life turns out to be easier in Fedora, openSuse is going to get the boot.

Here’s my notes on the process of triple booting:

  1. Use GParted to shrink the two existing opensuse partitions and get some space. Size, methods, etc will vary depending on your partition layout. This will take a lot of time. If you put space in the middle or somewhere, you’re probably going to have to do a block-by-block copy. Its slow. I started it, and then went and ate lunch. The process was still running when I came back.
  2. Install Fedora. Use the custom layout tool (again). The partition I ended up using was /dev/sda8
  3. I installed grub to the first sector of /dev/sda8. The reason is that I setup opensuse to chainload into Fedora. This was easier at the time then installing Fedora’s grub to the mbr of the drive and replicating my openSuse entries.
  4. When you reboot, you’ll have to boot to openSuse. Use the bootloader tool in openSuse to add a chainloading entry to /dev/sda8 or wherever you ended up installing Fedora to.
  5. Reboot again. Pick Fedora and chainload to Fedora. Let the bootloader for Fedora run through. You could optionally change the time-out for the Fedora boot loader to 0 once you get into Fedora.
  6. Do the Fedora setup thing. Not to hard
  7. For the broadcom-wl drivers for the Broadcom 4313 in my eee, I needed to add the rpm fusion repositories. Referenced from here, run the following in terminal:
      su -c 'rpm -Uvh http://download1.rpmfusion.org/free/fedora/rpmfusion-free-release-stable.noarch.rpm'
      su -c 'rpm -Uvh http://download1.rpmfusion.org/nonfree/fedora/rpmfusion-nonfree-release-stable.noarch.rpm'

    At the password prompt enter the root password then press Enter.

  8. su -c "yum install broadcom-wl"
    su -c 'modprobe wl'
  9. Configure optional software. My immediate install list is:
      su -c "yum install geany yakuake firefox"

If you want to reinstall grub to the root of the member and let Fedora take over, you can do a google search for “reinstall grub fedora” and find out how.

That’s a crappy update, but one none the less. Hopefully I can do a more personal update. Until then, keep it real.

*Source*
Broadcom setup help: http://fedoramobile.org/fc-wireless/broadcom-linux-sta-driver


ASUS Eee PC 1015PED-MU17-BK (Part 1)

Introduction

Update: Finally made Part 2. Enjoy.

My quest for a laptop supporting linux has come to a close. However, that doesn’t mean that the category “my laptop+linux” is invalid anymore. There’s a whole world that I’ve just now passed through the gate of.

Alright. So my netbook is the ASUS Eee PC 1015PED-MU17-BK, which you can find here. I’m getting tired of Newegg’s crap with shipping, so it is with some reservation that I link to newegg. I also purchased a memorex USB CD drive from Staples.

I’m thinking that his will be a two part blog post. The first is going to be about getting linux onto the netbook. Part 2 will be a hardware review. The one thing I’m going to mention is that I went and bought a external CDDVD drive for this. There seems to be some tricks for booting from a SD cardusb drive that I haven’t found out yet. The CD drive made it so that I didn’t have to worry about that. It made my life a lot easier in a few other things as well, so it seems it was worth the outlay of cash.

Backing Up the Eee In Preparation For the New OS Install

The stock 1015PED comes with Windows 7 Starter. There is no aero, you can’t change change the background, and probably a few other things I didn’t take the time to find the limitations of. Mine shipped with a western digital hard drive, so I backed it up about 3 different ways using this, Acronis True Image WD Edition Software. Its a horrifically locked down version of Acronis that you can get from Western Digital because you’re purchased one of their Hard drives, but it did what I needed. I always advise at least backing up your HD with software. If you can afford it, it’s best to just install a new HD, so you always have the factory version. Acronis is the best imaging software I’ve used, hands down.

Factory Partition Layout

Let’s talk about the default Asus partition layout. The first partition is Windows 7 Starter, about 100 gigs. The second seems to be a backup for Win 7. The third partition is about 117 gigs, and is just empty, which is very nice for us. The fourth partition is named 0xFF (I believe), somewhere labeled “EFI”. After some googling I found that this is what Asus uses to enable rapid booting. This is actually a fairly optimal layout, all things considered though it does present a need for creativity.

Installing The Fresh OS

Installing Windows XP?

Originally, I was going to install Windows XP. I know that its a out-dated OS. However:

  1. It wasn’t going to be a primary operating system. I intended it just as a backup, for when I ran into something that just “had to be done” via Windows.
  2. It was light on resources. With only a gig of RAM, Win 7 will work, but a fresh install ends up reserving about half of the available RAM for its bloat.
  3. Same with the vid card. Win Xp doesn’t have aero. I can turn aero off, but its a nice eye candy feature and is something that I feel the Win 7 interface leans heavily on.
  4. It would do what I needed.

Okay, Maybe Windows 7 Instead

Sadly, the Eee seemed to need a hard disc driver that I couldn’t get the windows XP installer to recognize, because I had the files on a USB drive instead of a floppy disc. I believe I could have pulled off the install, as I have a USB floppy drive. But I didn’t want to fight the installer, so I settled on a fresh Windows 7 Professional install. The bonuses of using Win 7 are:

  1. Drivers are SUPER easy. Win 7 will literally go and find the device driver and install them for you.
  2. Security wise, Win 7 is bounds ahead of Win XP.
  3. End of Life is coming up for Win XP. I would have had to install Win 7 then anyways

The Actual Install

I over wrote the current Win 7 starter install. The had the bonus effect of preventing Win 7 from making its system reserved partition. I then use the Disk Cleanup utility to delete the old 20 gigs of Win 7 Starter install that Win 7 Professional had left on the system. I’m not going back and even if I do, I’m going to use one of those images I made with acronis to go back. The I installed all the updates available from Microsoft.

Other Windows Notes

While in windows, I also checked the layout of the disc, to make sure that I was going to overwrite the correct partitions. I wanted to leave the factory backup and factory EFI partition, mostly because I’m not brave enough to nuke them and find out what happens. I pulled open the start menu, then right clicked on Computer and chose Manage. I then found that the blank drive, G was partition 3. I wrote that down as I needed it for later. Then I made sure that the system clock is correctly set.

Installing Linux!

Then it was time to install my linux. That’s what getting my netbook was all about, wasn’t it? I’m not going to debate which distro. Some prefer debian, specifically Ubuntu. Recently, I’ve had just way to much trouble from Ubuntu, the rant about which I could make it own blog post. I used to prefer Mepis, which is a debian based distro. It has a dedicated developer and a vibrant, if small, community. However, I wanted something with a little bigger base, that wasn’t as “Kiddie” as I felt Mepis is. I moved to Fedora 13, code name Goddard which is the same distro that I use on my desktop. And, yes I went with KDE.

General Notes

I booted off the live CD. After I got it booted, I loaded the fedora installer. The prompts are easy, and somewhat user specific so I’m not going to cover everything. One note: on a purely linux computer, the system clock is set to UTC. This is note the case on something that is windows based. Make sure that you de-check the “System clock set to UTC time” when you’re setting up your time zone.

Partition Configuration

Next partitioning. I had to go with a custom setup because Fedora couldn’t figure what was happening with my hard drive partitions. It wasn’t to hard to setup custom partitions as the Fedora installer is pretty smart. I deleted the Asus pre-made 117 gig partition (#3, I had you write that down, remember?). Then from that space I made the new partitions. These actually ended up being sub-partitions, but they work anyway.

Root Partition

My first partition is the root partition. The dialogue gave me a choice making it a specified size, using all the space, or saving some space off the end of the new partition. I picked the option to save some space off the end then told the Fedora installer I wanted 2075 megbytes reserved. The ended up being /dev/sda5.

Swap Partition

Linux installers will usually complain if you don’t have a swap. As near as I understand it, its kinda like virtual memoryram a place to files if you want to hibernate a computer. You don’t have to, but if it complains there’s probably a good reason why the installer is doing so. That’s why I saved the 2075 megabytes off the the end of my root partition. Usually, your swap should be at least as big as your RAM. I can expand my Eee to have 2 gigs of RAM, which is equal to 2048 megabytes. That’s what I saved that last 2075 megabytes of space on the HD for. A little breathing room is always good. I created a a new partition without a mount point and setup as swap. Then I chose the option to use the remaining space. Easy.

Final Notes

After that I continued with the installer. For the boot options, I renamed “Other” to “Windows 7” because that’s what its detecting, it just isn’t labeling it correctly for me.  I also installed grub to the mbr portion of the hard drive, something I also advise. From there, its pretty dang easy. Run the rest of the installer, then reboot.
Fedora will run you through some prompts, answer those and you’re off.  On thing you may want to do is

su; yum install synaptic

and then you can use apt-get in fedora and well as have the excellent synaptic package manager.

In Conclusion

That’s all I’ve got for now. I know I’ve played perhaps a bit to much with the <h1> and friends in this post. If it really bothers you, leave a complaint. Leave any notes, suggestions, etc in the comments. You can also tell me how stupid my current layout is if you’d like, however be prepared to give proof on why its better. Also, you’re responsible for the warranty on the horked up netbook.
On thing though, don’t use a fake email. I have your IP adress. That means you, strange fellow from University of Chicago in the ITS department who seems to have a real problem with the way I’m handling Geany Portable.


Twitter Script Update

Howdy. Twitter changed the search format, which means my php twitter script wasn’t working correctly. I finally took the time to remedy that tonight. Here’s the updated source code:

', $content);
        $content = explode('', $content[1]);
        return html_entity_decode($content[0]);
    }
    $my_tweet = get_latest_tweet('Username');
    if ($my_tweet != NULL)
        {

            echo "$my_tweet";
        }
    else {
        echo "Twitter is having issues again . . . .";
        }

    ?>

You can reference my old blog post if you want to know more how it works. For the copy/paste types: make sure you cange “Username” on line 20 to your twitter ID.


Compiling Wget on Windows

Last night, I managed to compile Wget on windows, with the SSL options. Compiling wget on windows isn’t really that hard. With MingW is works pretty well. What doesn’t work that well is getting SSL to work, because you need to compile OpenSSL, which is a pretty crappy distribution of SSL. And I never seemed to be able to build OpenSSL within MingW because it relies on autotools which doesn’t work on windows.

Brief note for authors of software: If you want a windows port, make it so I use make, or nmake. Which ever compiler you choose, build it so that I can just build the software, not fight it for an hour, then give up. I will hate you, I will hate your software. And I will have nothing nice to say.

Anyway, I reinstalled windows on my computer. Which means in theory I lost everything I had previously installed. I’m taking a C++ class, and I need a local compiler to code on. So after alot of deliberation, I settled on using MSVC. Then for grins, I decided to build wget with it, and try to get SSL working. I managed it. Here’s my notes on the process:
Installation Setup

  • install visual studio 2008 professional. You might be able to use an express version, but courtesy my colleges I have copies of MCVS 2008. So, I’m making use of it.
  • install active perl 5.10. I don’t care for the activestate distro of perl, but this is what the authors list for openssl and its best to stick as close to the readme files as possible.
  • there is a enough nasm included with vs2008, so you don’t need to install anything extra
  • Update VS2008. Use MS Update.

Compile Open SSL. I used version openssl-1.0.0a.tar.gz. Note that you won’t have the assembly libraries with the following commands, but wget a)doesn’t seem to need them, and b) you won’t have any errors this way :).

  • > perl Configure VC-WIN32 no-asm --prefix=c:/openssl
  • > msdo_ms
  • We want to make a static version, so we don’t have to include the DLLs with our wget distro. Of course, this increases file size, but picky picky.

  • > nmake -f msnt.mak
  • > nmake -f msnt.mak test (optional)
  • > nmake -f msnt.mak install

Build Wget:
The authors of wget include a long winded about compiling Wget 1.12. The short version is, the make routines are mangled and unusable withing wget 1.12. A better windows developer then I want to step up and help? Since it doesn’t work on windows, I used the previous version, wget-1.11.4.tar.gz.

Now, if you don’t’ want SSL, you can skip this part. If you do want SSL, then readfollow.

The wget readme says:

For MSVC the current default is to build Wget with SSL support.  For this to work, you will need to have penSSL installed.  First, get OpenSSL (http://www.openssl.org), compile it and install the relevant headers and libraries where your compiler can find them; currently this could mean (presuming default installation directories for MSVC 6.0) copy (from the compiled OpenSSL directory) the whole inc32openssl directory and its contents to “C:Program FilesMicrosoft Visual StudioVC98Includeopenssl”, and from out32dll (in the openSSL directory) the two needed libraries (libeay32.lib and ssleay32.lib) to “C:Program FilesMicrosoft Visual StudioVC98lib”.  These locations aren’t exactly the best but will get you started if you don’t know where to place these headers and libraries, you should find similar paths for later compiler versions. Usually at run-time some OpenSSL libraries (currently ssleay32.dll and libeay32.dll) will need to be available in your environment PATH.

My distilled version is:

  • copy the C:opensslinc32openssl directory to “C:Program FilesMicrosoft Visual StudioVCIncludeopenssl”
  • Copy the contents of C:openssllib to “C:Program FilesMicrosoft Visual StudioVClib”.

Now, change directories to the extracted wget dir and execute the following:

  • >configure.bat --msvc
  • >nmake

You’ll probably get some errors related to makeinfo.exe or other stuff. But if you execute dir src/*.exe you should see a wget.exe listed in the directory. If so, success. If not, sorry. The final test is to execute src/wget - -help and see if you have SSL options.

To be honest, this guide is really a lot of copy/paste from the various readme files included in the distributions of openssl and wget and my smart aleck comments. I’m just listing the way I did it because there’s only really one good guide online, and its sadly outdated.

I’ve uploaded my binary here, for those who just want wget. Really, you only need to build it you don’t trust me. Everything should be statically compiled, with no dependencies. I’ll be testing it in virtual machine later to be sure.


Quick PHP Note

I’ve been busy hacking the code on somebody’s site.  I just wanna mention the fopen command in PHP.  And how you shouldn’t use it.  It’s frightfully frail, and there’s little to no information on how to make it work.  And sometimes webhosts disable it in the php.ini config, so it doesn’t always work.    Use $data = file_get_contents(“some_random_file.file”) instead to put the contents int a variable.  If you need to make an array from it,$ array = explode (“n”, $data);  instead of fget.  Then call $items_in_array= count($array) – 1; to get the total number of items in the array.  Its a little more wordy, but I think has the same number of lines as the while() loop would require.

Just don’t use fopen.  Please.  Its buggy at best, and possible maybe seemingly unusable in wordpress.  Which is why I had to convert my code from using fopen to file_get_contents.

One more note.  A function’s “present working directory” in wordpress is the directory it’s installed to.  echo getcwd(); as proof 🙂  Which, if I say so myself and I will is stupid.  Total stupid.


M.M.S Project, Biological Systems

Biological Systems Album coverI’ve found myself listening to this album alot lately.  It’s something that you can get lost in, and the only way you know that you’ve started again from the beginning is the unique intro.
The album starts out in what I imagine to be a corner coffee shop, somewhere outside in France.  You can hear people laughing, and a accordion playing.  From there, the beat changes and so does the album.  It begins.  The album features a driving back beat, with alot of synthesized piano runs. Existing on the album are pure piano runs and modified, effects modifies drives.  Ever shifting, the authors manage to flow from one track to the next. Listen for the stereo shifting drum beats on the end of Back to Psicodelia, the second track of the album. MMS Project extends this even further with its next track, Out of Cell. Flowing, shifting, changing is a way to describe the album.

This is a dance album, something you could move to. Something to workout to. Or, as I do I use it to help relax and control my mind’s speed. I’ve been listening it to the last few hours and I am sure that it gets alot of playtime on my mp3 player. 

This album is what a true trance dance album should be, something that flows from track to track. Something to get lost it without knowing. It has the power to help you focus on your work, or focus on the music itself.

I’d like to describe the album more, but I’m terrible with words.  You should download and listen yourself.  Yes, I said download.  You can even do it legally.  Biological Systems is listened under the Creative Commons License, meaning you’re free to review, copy, burn give away, sample and more.  But the best part is the freedom to download.

Take a gander and listen, you might enjoy it. M.M.S. Project, Biological Systems


Custom Guitar Case, From Scratch.

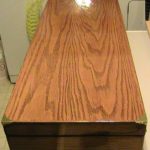
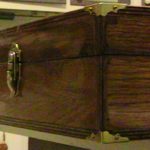
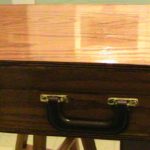
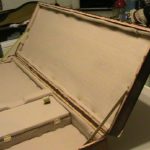
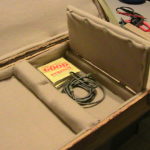
This post is about my new electric guitar case.  I lone my electric guitar to my brother because he plays the guitar, and I do not.  He travels with the guitar so much, that the old case was beaten into the ground and as such, the guitar was desperately in need of a new case.  The old one served well, but it was breaking by the small storage area and as a result the side was falling out which was making the case useless.

My thought process on things like this starts with, “Can I make it?”.  The answer is yes, I can make a guitar case.  Maybe not a fun curvy case, but I don’t really like those kinds all that much anyway.  My next question is, “I can make it, but will it be cheaper?”  I foolishly thought that I could.  This is technically true, provided you picked one of the high end cases.

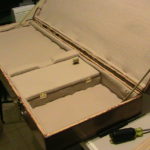
Before I show pictures, let me tell you some of what I did here.  Each wood edge was glued, nailed, and then clamped overnight.  I used 1/2 inch oak plywood for the outside and a few other places.  There is a 2×4 in there that supports the neck and keeps the headstock from taking weight.  For a finish, I used three coats of stain and three coats of polyurethane.  Internally, there’s 2 layers of padding everywhere the guitar will contact, and four on the lid to build up the padding and to keep the guitar from sliding around.

The balance is pretty decent when the guitar is in the case.  Sans guitar however, its forward heavy.  The whole thing itself is just heavy.  I wouldn’t suggest letting go accidentally.  Though the case and guitar would probably be fine, your toe would describe its urge to fall off in a colorful, metaphorical way.  As far as the guitar fitting in the case, I can shake it and the guitar won’t move which is a good thing.

I can’t really tell you guys the build time, do to the fact that I didn’t keep track and worked harder the closer I got to deadline.

The guitar itself is a Vantage, though I haven’t managed to find out much anything else about it and only a little more about the brand.  The light spots you see on the exterior of the guitar case are the reflection of the lights overloading the light sensor in my camera.  I’m serious.  You can see yourself when you look at it.

Yes, there’s definitely some things that could have been done better.  But, honestly, I don’t think I would have known without having previously built a guitar case.


Running Teamspeak 3 Client as a Portable App

I always try to use software in a portable format. This means it leaves nothing in the way of registry entries or dropping somewhere on the system.

I’m happy to report that the Teamspeak 3 Official Client is natively portable.
Mostly.

Since it uses QT4, is has the requisite trolltech registry entries left in the registry. But anything important gets directed to a folder called “config” (if present) in the install directory. I’ll probably be making a quick launcher to handle these few QT annoyances, but I make no promises.

In short, to carry your TeamSpeak 3 client with you, just use the option in the installer that says it will save settings to the install directory. Alternately, you could make a folder called “config” in the Teamspeak 3 folder and have it save its settings there.

*Update: It seems I missed seeing something in the regshot I took. There’s a key, HKCUSoftwareTeamSpeak 3 Client. There’s nothing in there, but it will come back on every run.

Adios!


Finishing Notes

Introduction

I want to say this to start: Follow the directions on the can. It may seem like a cop-out to say, “Follow the directions on the can”, but they were put there for a reason. They stain company spends alot of time researching the best way for you to apply their stain. Trust them, they know what they are doing. This are just my general process notes that go a little beyond what is on the can, and is what has worked for me.

Sanding

First, sand your wood surface really well. For flat surfaces, I sand with a random orbit sander and work through 80 grit, then 150 and a final sand with 220. If I’m not sanding something that’s flat, like a walking stick, I run a first sand with the orbit at 80 grit, then sand by hand through 80, 150, and 220. Its important imperative that you sand the surface you want to finish. It brings everything down to a nice, smooth surface and makes it easier for polyurethane to seal. Beautiful, smooth to the touch finishes happen because somebody spent extra time sanding them. No amount of fancy brushwork will save you from a poorly prepared surface.

Stain

Second, stain. If what you’re staining is a softwood, get the can of pre-stain. It makes the finish work so much better by sort of sealing the wood a touch and smoothing out the final coloring. If its a hardwood, you won’t need it. Stir the can of stain, don’t shake. Shaking doesn’t do as good of a job as stirring as well as introducing air bubbles into the stain.

As far as which stain to use, I also don’t care for the gel stains. I bought a can, opened it, then took it back. It’s too thick for my liking. Oil based is what I prefer as it goes on easier, and towels off well. As far as brand, I find myself using minwax. They seem to be a fair price for the result. No, they don’t sponsor me.

Apply with a brush in the grains’ direction. Apply liberally, but not to much. Wipe it off with a clean, dry rag. This is what I find leaves a nice smooth stain coating on the wood. Leave for a few hours, then reapply. Clean your brush after each application, unless you’re using a disposable which you can pitch. Dry overnight or longer before moving onto the poly urethane. Or course, if you don’t want to stain the wood, you can skip staining and head to the next step.

Polyurethane

Using polyurethane, again apply to the can’s directions. After you put on a coat, start brushing from the inside out to the edges very lightly so you start to draw off the larger bubbles. You need to brush it very, very lightly for this to work. Allow to dry 3-4 hours, as per can directions. Don’t even count on that first coat being enough. Sand it with 220 lightly, just enough to turn the surface opaque but not to sand through to the stain. Coat again. At this point, you should consider a third coat. I usually end up with three coats and the surface is very smooth at that point, and quite nice and shiny. Sand with 220, then apply the poly. Allow to dry overnight on the final coat.

Brush Cleanup

Clean the brush thoroughly after working with the polyurethane, unless you want a plastic brick for a brush. Even wrapped in a bag, it will harden within 24 hours, leaving you with a worthless brush. I can’t stress how important it is to clean the brush each and every time. If you invest in a quality brush and take time to clean it after use, you will actually save money over time.

In Conclusion

Making a good finish on something is not hard. It just takes careful preparation, lots of sanding, and a little thought into how you apply the finish.


WordPress Stuck in Maintenance Mode

So, I went to update a plugin, then accidentally clicked away while wordpress was still running the update.  Yeah. Don’t do that. If you do, FTP to your blog directory and look for a file called .maintenance.  Rename it.  It should bring your site back up.  If it does, then you can delete the renamed .maintenance file.

To be honest, this isn’t an original idea.  I first found it here when I borked my wordpress install as described above.  Quick google, and I found it.  Here’s the link: http://wordpress.org/support/topic/blog-now-stuck-in-maintenance-mod