Category: amateur radio

Building a Ham Radio Power Supply

Ham Radio Isn’t Cheap

Much like shooting, ham radio is expensive. I think all fun hobbies are. But after spending $820 for the radio, I wasn’t in the mood (or the financial state) to drop another $100 to $150 on an Alinco Power Supply. Slick as spit, but not worth it.

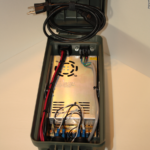
So, here is what I came up with:

My power supply has the following features:

  • Hacker cred. I put it together, and it looks nice and works great, on 2M at least.
  • Dual USB ports, for keeping a phone topped off.
  • A cigarette lighter, for powering/charging a baofeng or anything 12V compatible.
  • Dual Anderson Powerpoles on the rear, for the ham’s favorite 12V connector
  • Uses a standard computer power supply cable.

So, here is my Bill of Materials:

A few build notes:

  • I crimped the powerpoles using my standard channelock wire strippers and then soldered them with my hakko. This gives about as good as a connected as you can get.
  • I used standard spade connectors (though mine are from Menards), again crimped and soldered, to connect everything to the power supply unit.
  • Most ham radios expect 13.8VDC, instead of the 12V this one was outputting. That’s okay, there’s a dandy reostat you can use to adjust the output power. I had mine set for 13.81V and its drifted to 13.84/5. I suspect it has to do with the construction and actually powering the unit up. However, my 857 will tolerate a +/- 10% range, so eh. I’ll adjust it again the next time I fire it up.
  • Take care when making the AC Mains connections. I am using a cut\trimmed piece of a PC power cord, with crimped and soldered spade terminals connected to the socket and to the power supply unit. I used some push on connecters to make a removable/solid connection to my socket, then put heat shrink over the arrangement to make sure I had removed and electrocution hazard, as best as possible. 14VDC will tickle, 120VAC will kill, and hurt the entire time.
  • Cut outs for the Chassis mount and PC powersupply socket were done with an x-acto knife, a ruler, and a little bit of caliper work. Everything fits perfectly. Lay out the holes you need, then visually check the marks are in the right place. Make light passes with the x-acto to cut through the plastic of the dry box.
  • This is such a gadgety thing, but it makes doing zip ties so much easier, tighter, and with practice the cut offs cleaner.

The total cost of the arrangement? Not counting the sundries I had on hand, $54.04. Not bad, a third of the cost and quite a bit more fun. You could do this even cheaper if you skipped the power powerpoles and the other features, but charging phones is good. When I first made it, I had the radio and a cut off power cord running directly to the power supply unit. It worked, and worked well, but I wanted to make things cleaner for sure.

Questions? Comments? Leave them below. 73, and good night all.

Edit: I posted this to /r/amatuerradio and generated a fair response. I would like to highlight Megas3300’s RF Choke. This is probably needed for mine as well, but so far I’ve only used this on VHF. A proper HF antenna system awaits.
Icom IC-W32A: A Work in Progress

This is contingent to my “Workin’ the Birds” Series. However, it is a more technical discussion of amateur radio equipment. The primary purpose of this blog is preserve information I want for later. However, I feel that the information contained in these posts may be found edifying for others. If you can’t look up edifying, you are not the target audience of that secondary purpose. A third purpose is a demonstration of my technical skills and abilities as well as communication. It is not working as well as I would like.

I wanted an upgrade from my Baofengs for multiple reasons and the Icom IC-W32A is the radio that I ended up choosing. The W32A is well regarding within the Amateur Satellite Radio community as one of the best. After my post on the high price and poor selection of equipment available at this time, I ended up back tracking into the early 2000’s for my “new” gear. This HT is well loved. Wear spots, but no nicks or gauges. Used, but not abused. The only thing that was missing from what I wanted (better receive, reasonable price, better channel management, S-Scale) was better channel management, though there is the option of skip programming which may prove useful.

The bad is being an ebay radio (and 10 years old), I knew I would be needing a new battery. With this particular auction I didn’t get a charger either. At this moment in time, the charger missing is a bad thing. I don’t know if the radio will even turn on. While I was willing to risk what I did on the auction, I wasn’t ready to double the bill to fail. I need to know if this thing will power on and transmit. I was able to get around this though, with an adapter from RadioShack. Two options:

Since I have all of components for option 2, I went with that. The primary reason was the low cost – $3.50 and a bit of wire and solder. You could buy an official Icom Charger, but if this thing functions well, I’ll be switching to this lithium-ion battery pack. What a waste to get the official Icom option when I’ll use it … once.

After looking around the manual and talking with people on reddit and the AmSat mailing list, I was able to determine the polarity and power output of the plug. 12V, center positive.

After charging, the radio powered up! Oh joy. I at least have a reasonably priced scanner now. Except tuning to a NOAA Weather station, I do not have audio output. Plug in some headphones, and I have sound. Great. This could be either a broken speaker, or a broken headphone jack. Without the headphones, I have a working mic. With the headphones, I do not. For now, the solution is to find a reasonably priced handset to plug in. This will work until I have checked everything else out, and insure that the radio is worth my time to repair further. It will also provide inexpensive replacement parts. The replacement will be here Monday (4/18) and I will attempt to check into my ham club net with the radio that night.

That’s all I have for now. I’ll leave this post linking various resources and information that I found while waiting and getting the radio to function to this point.

Resources

Parts

Disclaimer:

Borrowing from my podcasts, this post is not sponsored by our employers, employees, who or what have you. All opinions expressed have been, are, and always will be our own. Said opinions expressed on the show are believed to be well reasoned and insightful. If you find a topic mentioned on the show interesting and decide on further action, then it is your responsibility to research, consult your doctor, lawyer, significant other, etc and understand the full risks of such an action. Providing a link to a resource online does not certify the usefullness, safety, or reliability of the content or providers on the other side.

The information in this post is semi-technical and capable of damaging\ruining\destroying your prized transceiver. It’s not my fault if you turn it into and efficient boat anchor.

Minor Update

I’ve found that filling a bit off the bottom of the plug from radio shack makes it connect more reliably.


Amateur Radio HT’s, A comparison

Short blog post today.  This is a spreadsheet I made comparing my choices for a new ham radio HT.  Not really notable, but the result of a bit of work so I thought I would share.  Click the spreadsheet to grab it.

2000px-Oxygen480-mimetypes-application-vnd.oasis.opendocument.spreadsheet.svg


Installing OpenWebRx On Fedora 22

I’m a pretty regular viewer of Hak.5. The point still matters. Hak5 Season 19 Episode 16 featured OpenWebRx, a pretty awesome web powered interface for an SDR dongle. I thought it would be useful for monitoring my ham club’s repeater. OpenWebRX is kind of limited in its use cases (to my mind) because of its limited frequency range. It neatly centers about 15 Hz on either side of the set frequency. The author states that its because of the multiuser intentions behind the software. However, that doesn’t mean OpenWebRx still can’t be useful – or fun to play with.

For my use case, I have two purposes:

  • General monitoring of my club repeater. Even though I have a baofeng docked and listening, I like the thought of it.
  • Another use is to slide down the frequency range touch and be able to test radio microphones without needing another person to phone back – plus I’ll actually be able to hear myself.

While not a flaw of OpenWebRx, the listening range of the SDR is pretty limited – at least with the stock antenna. At present, its not able to hear my club repeater. I’ve picked an adapter from Amazon in the hopes that putting something bigger then a measly 6 inches will pick up my club repeater. After attaching my 1/4 Wave Ground plane, there was noticeable improvement but it was still hard to hear the repeater. Local copies are very strong however, using my 5 watt HT.

There are no install instructions for installing from source in Fedora and there is no package within the Fedora repos. At present, you will have to use the dev branch of openwebrx for the system to run. You’ll see (if you read the ticket) that I promised the developer install instructions for Fedora. The following are the commands I used to get OpenWebRx running on my Fedora 22 headless server.


#OpenWebRx Fedora 22 Install Script(ish)
#Get OpenWebRx dependencies from the repos when possible (assuming you started with the same packages I had - you may need to install Development Tools, among other things.  I often install from source.)
su -c "dnf install dh-autoreconf fftw-devel libusb-devel -y"

#Get openwebrx source from github
git clone https://github.com/simonyiszk/openwebrx
cd openwebrx
git checkout dev #and switch to the dev package so it will run on Fedora 22

#Get openwebrx dependencies not provide by the fedora repos
git clone https://github.com/simonyiszk/csdr
cd csdr
git checkout devs #also need the dev version of this
make
cd ..

#need to build rtl-sdr from source - since udev isn't installed apparently by the repos, so .... yup, build from source
git clone git://git.osmocom.org/rtl-sdr.git
cd rtl-sdr

#build guide available from http://sdr.osmocom.org/trac/wiki/rtl-sdr
cd rtl-sdr/
autoreconf -i
./configure
make
su -c "make install && ldconfig && make install-udev-rules"

#openfirewall port since I want to be able to access this from across my lan
firewall-cmd --add-port=8073/tcp --permanent
systemctl firewalld restart

At this point you have to do some configuring to the config_webrx.py file. Go ahead and pop it open in your favorite editor, and add in the required info. One important thing to note, use the local lan address for server_hostname=. Also, note that openwebrx supports opening your server to the world. My DSL won’t support it so I’ve decided to disable that feature for the time being.

To run openwebrx, a simcple chmod +x openwebrx.py && ./openwebrx.py will get you up and going. For running openwebrx unattending, you need to use screen or tmux. Using nohup doesn’t work and creates a mess.


openwebrx-screenshot


Workin’ The Birds: SO-50

For a change of pace, I thought that I would try making contacts through SO-50. SO-50 is another FM repeater satellite and until the commissioning of Fox-1 as AO-85 the only FM repeater still operational.

Unlike AO-85, the uplink for SO-50 is 2M and the downlink is 70cm. Here is my channel configuration that I’m using for my baofeng. Here’s what I’ve learned since my last attempt.

  • Open the squelch:
      I was debating whether or not I would leave the squelch open in my last post. I’ve deciding now that I will.
  • Mount the antenna on a tripod:
      I’d seen about as many people with mounts as just aiming the antenna by hand. Tracking a satellite is hard, let alone managing two radios, a recorder, a time piece, directions …. I could go on.
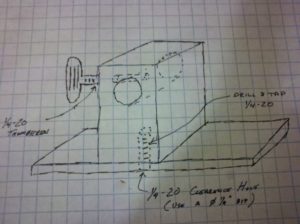
        I’ll be mounting mine on a camera tripod from now on. I found a piece of aluminum square stock, then I drilled a 5/8″ hole through it and then a drilled and tapped a 1/4-20″ through the side. Finally, I cut it off (about 2″ long) and drilled and tapped a 1/4-20 hole in the bottom. I find that I need a small piece of flat stock about 3 1/2″ long to put between the tripod and aluminum block. Clear as mud right?

    2016-01-06_18-51-11_328

      I cut a piece of 1/2″ copper pipe (that conveniently fits up the south end of a north bound arrow antenna). Insert it in the south end, then slide through the 5/8″ hole and tighten the thumbscrew to keep it in place. When I do a day pass and finish up a few other things, I’ll dedicate a post to the subject, with pretty high quality pictures.
  • I seriously need a way to orient angles
      Like, I set of protractors or something. Its very frustrating trying to track a satellite with no clue where the angles are.
  • Higher qualities recordings are only good if they’re complete:
      Oops. I noticed that my last recording wasn’t all that high quality so I tried to improve it. It worked, but I alo managed to get skips in the recording. I guess my droid 2 is getting old. Let’s see if I can’t find a decent dedicated recorder somewhere in addition to those protractors.
  • Relax, it’s late night pass and there’s only a few people on:
      No, seriously. I did an 11pm CDT pass and there were only 3 people trying to trade. Chill people. I said they were going fast and furious but for a late night pass it didn’t hold true.

Anyway, that’s what I’ve learned from my last two passes. Also, congrats to this young lady on her first contact. I also made my first contact last night, and yes, I was pumped.


Workin’ the Birds: Fox-1A

This is a continuation/review/progress report from my previous Workin’ The Birds post. The reason is to talk a little bit about the new bird on the block, Fox 1-A and notate what I learned while I tried to listen in on one of the passes.

Amsat just put in Fox 1-A into orbit and gave it the designation AO-85.  I was able to use the AmSat Prediction Tool to find out when the passes would be. I have a recording of what I was able to hear at the bottom of the post for you to listen to if you like.

My simple setup to get the recording was as follows:

  • A uv5r set for receiving, locked to 145.980. Placed on my left pocket with the volume cranked to max. I had the squelch set to 2.
  • A BF-F8HP setup to transmit to AO-85 w/ doppler shifts, using medium power, at 4 watts. I didn’t really have anything to say, and my tracking was so sporadic (as you can hear) that I didn’t try to get into the sat. I was prepared for transmitting with my throat mic however. Using a throat mic will prevent the echo crossing on the two radios. I had thBF-F8HP sitting next to the uv5r, clipped onto my left pocket.
  • For recording, I launched a sound recording app on my droid, then slid the phone mic out into my left pocket, underneath the baofengs. It should still have been able to pick up my voice.
  • I used an arrow antenna directional antenna.

What I learned tonight:

In my previous post, I mentioned that I thought magnetic declination might be an issue. NOAA has a website showing magnetic declination and for my QTH magnetic north is … only off by 2 degrees.

Rotating the antenna along the boom can make quite a difference in receiving ability.

I would debate the value of leaving the squelch open. In the future, I’ll set it to 1 or 2. When you get close to the satellite it will open the squelch, letting you know you’re in the neighborhood of what you’re aiming for.


Amateur Radio and Workin’ The Birds

You can view the follow up posts in the Satellites area of my blog.

I originally wrote this piece for Core Concept Podcast. While I hope to resurrect the podcast, I needed to gather my thoughts on what I know as I work towards my goal of making contacts via the ham birds. I decided to attempt contact via the birds after the ARRL Field Day 2015.

Please know that this is not a complete, working guide to making contacts via Ham Radio enabled satellites. These are my notes on the subject, a goal which I’ve been unable to complete yet. I needed to make notes of what I’ve found and learned so far. I figured that I may as well make them public for all to see in the hopes that someone will find them useful.

Equipment

Antenna

The equipment needed is pretty simple. Youtube has videos showing people making contact with an HT turned sideways. However, contact is made easier with a yagi antenna which focuses where your radio transmissions will be sent or received. I elected to purchase an Arrow Antenna but plans for tape measure yagis and beam yagis that you could make are available online. Ham birds usually have a 2m uplink frequency and a 70cm downlink frequency. Sometimes its inverted however, so you would want to make sure that your yagis tuned for both.

Radio(s)

It is often advised to use a second radio so hear whether or not you are coming through the satellite. Otherwise, enabling dual watch on your baofeng should be sufficient. So I can know if I’m making it through, I ordered a Baofeng BF-F8HP to use. Having a second radio will also give me a backup unit for my shack. Another advantage is that the BF-F8HP transmits with 8 watts of power instead of the 4 watts the Baofeng UV5R has, so the F8HP should expand my range, if even for just a touch.

Documentation

Another thing that is noted it it would be worth recording your session so that you can make sure you have copied your QSOs correctly. I will use my laptop and my Blue Snowball microphone to achieve this.

Prepping to Make Contact

Finding Satellites to Contact

If you’re using a baofeng HT, you’re limited to FM birds only. KD0HKD has a great page listing a number of birds equiped with FM repeaters. However, most of his documentation links for the satellites have gone dead, lost to the passage of time on the internet. That’s okay, because some of Amsat’s own links are no better.

I was advised to pick two satellites to work on a regular basis. I was going to try to work SO-50 and the ISS but, alas, the ISS Fan club reports the FM repeater has been down for quite awhile now. So, I’ll stick with trying to work SO-50 and wait for when Fox-1A is operational.

Getting your gridsquare

To make contacts via a satellite, you’ll need to know where to point your yagi. Your gridsquare will give satellite tracking software the ability to determine where a satellite will rise in relation to your location. Also, when doing an exchange over a satellite, one of the pieces of information you’ll need to trade is your gridsquare.

You can calculate your grid square using the awesome Grid Square Calculator from Levine Central which allows you to enter your call sign to calculate your grid square representing your location on the globe. QRZ.com provides one as well, but it is more complicated to use.

Your elevation can be a little hard to find, but the wikipedia page had the elevation for my home town so I used that (and suggest you do to). Satellite trackers need this information as well.

Finding Satellites

There are a few different ways to this. You can use one or more of the following three resources:

  1. The Amsat Satellite Tracker. Very confusing, will only give a list of passes and headings. Will only show the passes for a single satellite. Shows pass times in UTC, so you will have to convert them to your local time zone or it will be useless.
  2. Heavens Above android app. Has a nice “live sky” plotting ability. I don’t think it was designed with Ham radio enthusiasts in mind. Can pull your location from GPS.
  3. GPredict. Probably the best option in my opinion. Not very user friendly, but provides a wealth of information once you understand how the program flows. And there is actual documentation (so far).

On both the AmSat Satellite tracker and GPredict you will need enter your grid square, elevation. I think GPredict is the best option currently.

This is the point where I haven’t been able to translate technical knowledge into physical experience. So everything is abit fuzzy from here on out.

Go outside, and using either a lensatic or baseplate compass figure out the points on the horizon where the satellite will come up, the mid point of its travel, and the point on the horizon where it will descend. Remember to account for magnetic declination.

Connect your radios to the arrow antenna and open the squelch on your receiving unit. Coordinating with the times and azimuth points that GPredict provides, trace the path of the satellite. When you cross the broadcast path of your chosen satellite the static will fade from your reception. You may also hear the call signs and gridsquares of other sat users.

If you can’t find your satellite, Amsat has a status page that other hams can report if they have been able to use a satellite. It may be worth checking and seeing if others have heard from the bird recently.

Additional resources


Fixing Over-modulation in a Cheap Throat Mic

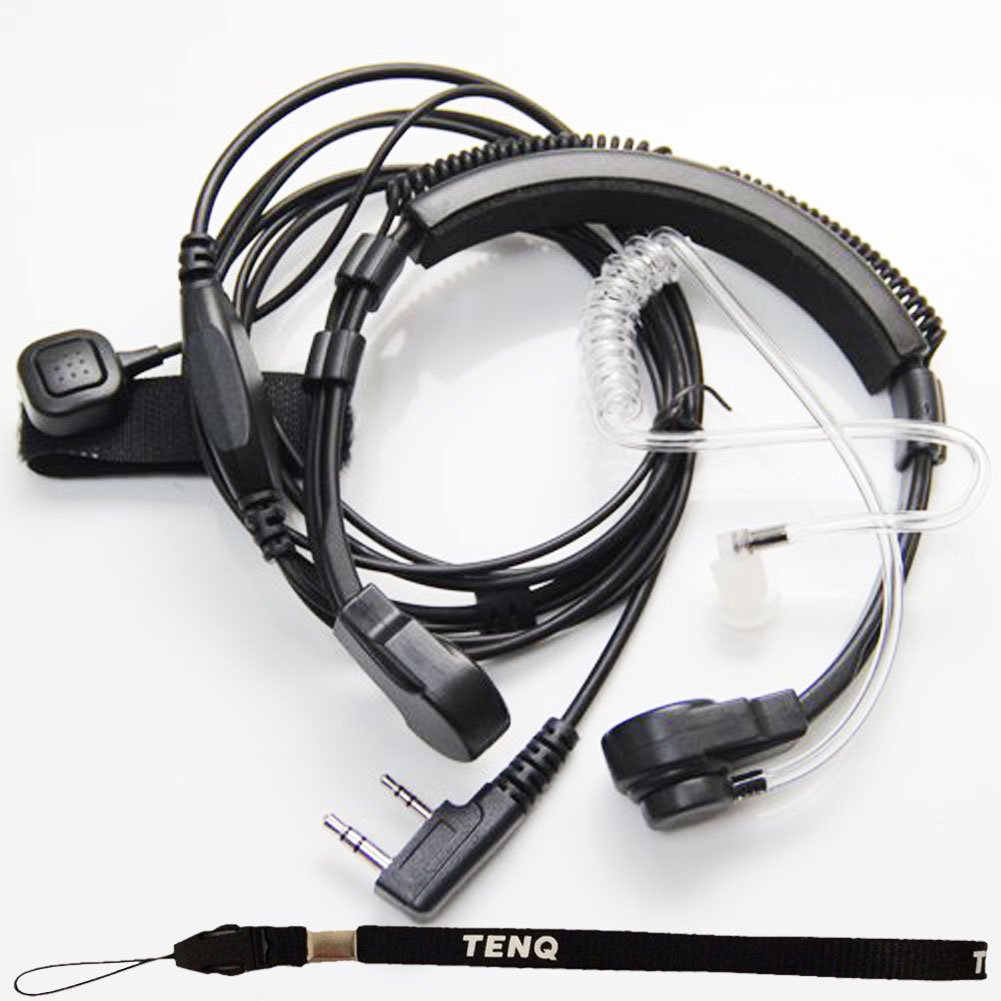
I purchased this throat mic back in April. When I hooked it up to the UV5R, it was reported that I was over-modulating the mic. In layman’s terms, the mic was so sensitive that it was picking up my voice so well it was “overdriving,” or clipping the audio. You can see a fair example at the beginning of this youtube video:

So how to deal with the over-modulation in mics? If you have your Technician’s license, you know that this is one of the questions on the Amateur Radio Technician’s test. The answer is to move the mic further away from your mouth. But throat mics use a piezo element which translates vibration into an electrical signal. So, to work, they have to be touching the source of the vibration.

The solution is to dampen the vibration. One way to handle this is to rotate the throat mic about your neck so its not directly setting over your voice box. But, in my case, it wasn’t enough. To much low end in my voice, I suspect. In the end, the solution I employed was to put some theraband between the cup wall and the piezo element in the cup.

Theraband is basically rubber banding. Removed from sunlight, it doesn’t break down like a regular rubber band will do – an excellent quality for our intended use. Jorge Sprave uses it for his ridiculous launchers. I had some left over from a previous infatuation. If you don’t have theraband, you can use foam sheeting. I actually wanted to use the foam sheeting, much like this amazon product, but all I had was theraband. The idea was to reduce the amount of vibrations that the mic can “feel” by adsorbing some of the vibrations produced by speaking.

In the photo of the throat mic, the piezo element is located in that left hand cup. You can take it apart by removing the two Philips head screws on the inside of the band and gently pulling the cups apart. Then cut a piece or theraband or foam sheeting into a circle (a nickle is about the right size) and place it in the cup in between the piezo element and the inner wall that will be contacting your throat. Put the cups back together and then screw the screws back in. Be careful – the cheap plastic strips easily. I ended up needing to use some black electrician’s tape to hold mine together because I managed to strip out the screw holes and then lose one of the screws. I actually only needed a single piece of theraband to bring the mic into a usable range.

I used it to check into the local repeater net earlier, and heard no complaint. I’ll have to check with the fellow that pointed it out, but if I’m still over-modulating I’ll just place another coin sized piece of theraband between the cup and the piezo element. This is probably my favorite mic system to use. The acoustic tube makes for discreet listening and the mic needs to be directly on the sound source so it won’t pick up background noises.


Welcome To Ham Radio

So, I qualified for my amateur radio license in November. I was asked the other night about how to go about acquiring one for yourself. My response was pretty simple:

Studying at http://hamstudy.org , paying $15 to take the test at a club, $35 for the baofeng + $10 for a Nagoya na-701.

.

But I thought in addition to fleshing out some links, I would give some other things that I’ve learned in the few month I’ve had my license.

Studying for your test at hamstudy.org is great. It’s not the eye stabber that most ham test sites are. But you will learn the questions and answers. You’ll need to read outside of that to learn how to actually ham. Thankfully, almost everyone in the community I’ve met is willing to teach you what you need to know and to give advice. Its called elmering. Not everyone will elmer you, but everyone is pretty welcoming and will through a bone to you if they can.

Hardware

  1. Programming Cable. You definitely want the programming cable. The baofeng is notoriously hard to program. There’s guides online, but this make everything super simple, especially when you pair it with chirp.
  2. SWR Meter. Strictly optional … unless you want to build antennas. I’m not sure how accurate it is, but I get great signal reports on the baofeng after tuning my antenna with it.

Online Resources

  1. Chirp. Its great. It can also be used to backup your radio presets (which I do).
  2. Repeater Book. Repeater book is a great way to learn about the repeaters in your area. Using a repeater is a great way to expand the range of your hand held.

Etiquette

Or, what I wish I could have been told to start
How do I get into a conversation? The correct way is to wait for a pause or break in the conversation, then key and state your call sign.
NATO Phonetics: Please learn them. Please use them. Yes, Kangaroo Dingo Nine Fluffy Chuckie Oppenhiem works, but when you have to revert to phonetics, its probably because the signal isn’t as strong as it could be. As an operator, you’re expecting certain patterns. By using the correct Kilo Delta Nine Foxtrot Charlie Oscar, we’re hearing a pattern we know and thus we can match it better.
Making sure you identify every ten minutes: I purchased this sand timer from Amazon. Flip it the second time, and identify a bit through that second flip.

Antennas!

The antenna is arguably the most important part of your rig. The antenna that comes with the UV5R is crap. That’s why I said to switch for the nagoya. But I also want to throw out the antenna I’m currently using – a 1/4 Wave ground plane. My local ham club is on the 2cm band, so I made and tuned this antenna for the 2cm band. It works great, and under the right conditions I’ve made a 54 mile reach with the 4 watts from my baofeng.

Community

Another thing you can do is reach out for advice through the internet. ##hamradio on freenode is a good place to hang out. Another good amateur radio community online is /r/amateurradio.

That’s all I can think of for now. I’ll post a follow up as I learn more.